Almost 70% of consumers decide whether to shop based on how fast a site loads.
Speed isn’t just a tech issue, it’s a revenue issue. A slow site means lost sales, frustrated visitors, and a checkout that never happens.
Let’s break down the exact steps to make your store lightning fast, plus the best tools to test its performance. By the end, you’ll have a site that keeps customers engaged, browsing, and most importantly buying.
What is eCommerce Site Speed Optimization?
eCommerce site speed optimization is all about making your store faster and friction free, so both search engines and customers love it.
The goal? Cut down page load times to create a seamless shopping experience.
How do you get there? A mix of smart techniques like:
- Using a CDN for faster content delivery
- Optimizing images so they load in a flas
- Leveraging caching to speed up repeat visits
A fast site keeps visitors engaged, lowers bounce rates, and most importantly drives more sales.
Is Your Online Store Fast Enough?
Speed isn’t a guess, it’s measurable.
There are key performance metrics that tell you exactly how quickly your pages load and how well your eCommerce site performs. If your store isn’t optimized, every extra second costs you potential sales.
Let’s break down the metrics that matter.
Here’s the quick view:
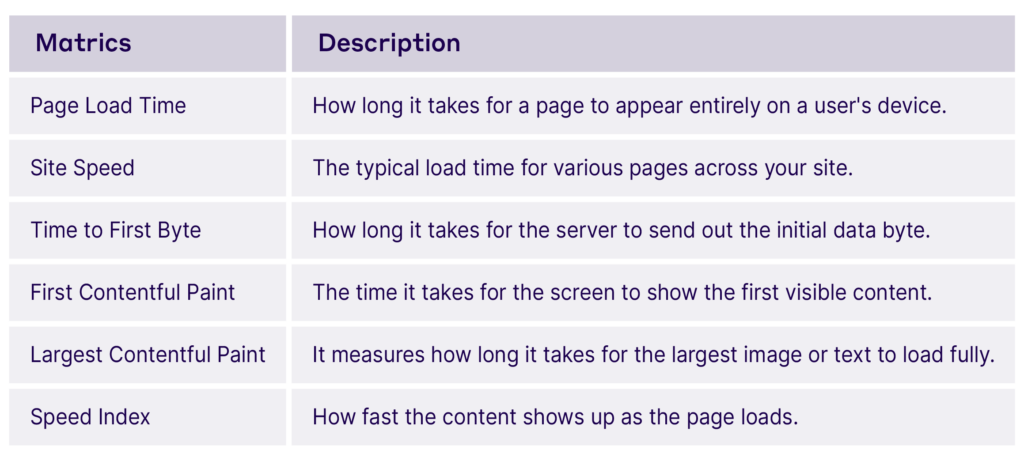
To see how your store measures up, run it through tools like Google PageSpeed Insights, Pingdom, and WebPageTest. These reports break down exactly what’s slowing you down and where you can speed things up.
We’ll cover how to run a full performance audit later in this article.
Why Is Website Speed Important in Ecommerce?
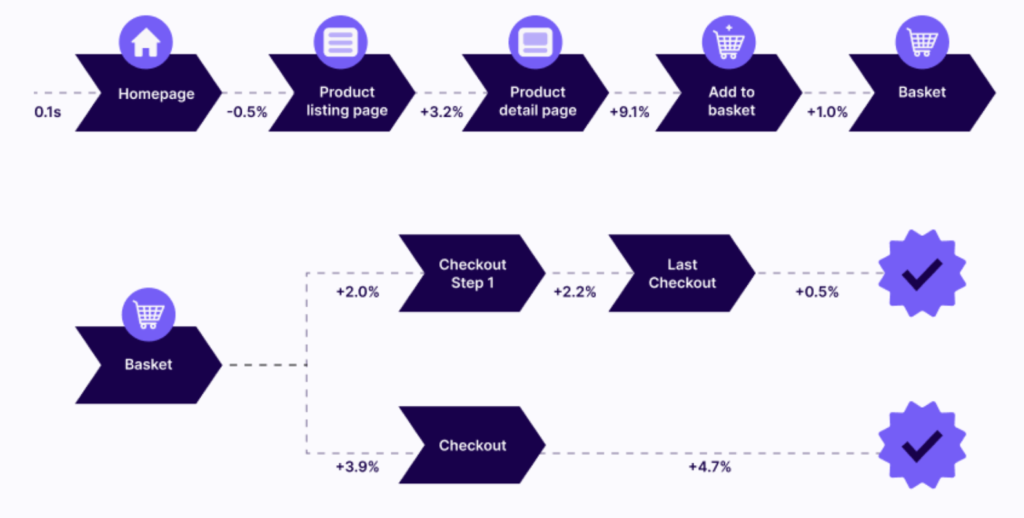
A fraction of a second can mean the difference between a sale and an abandoned cart.
In a study with Google, Deloitte found that improving your site’s load time by just 0.1s can boost conversions by 8.4% and increase average order value (AOV) by 9.2%.
Speed isn’t just a technical fix, it’s a revenue driver.
Why Does Speed Matter So Much?
Because faster websites mean happier customers.
Your site’s speed and Core Web Vitals directly impact user engagement. When pages load instantly, shoppers stick around, browse more, and actually make it to checkout.
A slow site? It’s a deal breaker. No one waits around for a product page that won’t load.
And it’s not just about users, Google cares too. Faster sites rank higher, get more visibility, and pull in more traffic.
Speed isn’t just nice to have, it’s non negotiable.
5 Key Factors That Impact Your Site’s Speed
Every second counts. As you go through these factors, think about which ones are slowing you down and where to start optimizing first.
1. Your eCommerce Platform Matters
Your CMS (Content Management System) is the foundation of your store. It affects how well your site handles traffic, loads content, and responds to customers.
A well optimized platform ensures smooth performance, lower bounce rates, and better search rankings without you having to tweak every little setting manually.
Here’s a quick breakdown of the four most popular eCommerce platforms and how they impact speed.
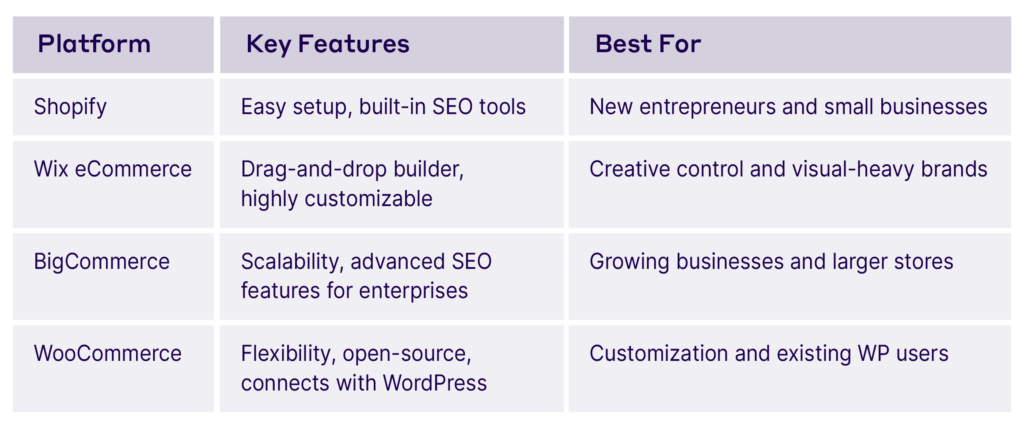
Which eCommerce Platform is Best for Speed?
Not all platforms are built the same when it comes to speed.
- Shopify delivers fast load times and a seamless user experience.
- Wix performs well but may show slight declines over time.
- BigCommerce is stable, keeping up with performance demands.
- WooCommerce offers flexibility but requires manual optimization for speed.
Shopify comes with built-in server speed, CDN, and caching, making it an easy choice for smaller businesses that want fast performance with minimal effort. On the other hand, WooCommerce requires manual setup but gives you full control, ideal for scaling businesses that need deep customization.
So, which one is right for you? It depends on how much control you need versus how much ease you want.
2. Hosting Quality: The Backbone of Your Site’s Speed
Your web host is your store’s foundation. A strong one keeps your site fast and reliable, a weak one slows it down, frustrates customers, and costs you sales.
Better hosting means quicker server responses, smoother browsing, and the ability to handle high traffic without breaking a sweat.
If your store is lagging, your hosting might be the culprit. Choose wisely, because speed isn’t just a perk, it’s a necessity.
3. Website Architecture: Build for Speed, Not Just Looks
A well-structured site isn’t just easier to navigate, it loads faster too.
When your pages are logically organized, your server retrieves information more efficiently. A messy structure? It forces the server to work harder, slowing everything down.
Here’s how to keep it clean:
- Simplify navigation – No one likes a maze.
- Reduce unnecessary elements & code – Clutter kills speed.
- Fix checkout flow & UX – A confusing process = lost sales.
This is even more critical if you sell different types of products (e.g., online courses, art, and eBooks). A clear structure makes browsing effortless while also streamlining your backend code, faster for customers, faster for your site.
4. Third-Party Integrations: Less is More
Apps and plugins can supercharge your store but they can also slow it down.
Each integration adds extra code and server requests. Too many? Your site becomes sluggish, unresponsive, and frustrating to use.
Here’s how to keep things fast:
- Stick to essential plugins – If it’s not driving sales or improving UX, ditch it.
- Regularly audit performance – Some apps might be secretly dragging your speed down.
- Keep everything updated – Newer versions are often optimized for better efficiency.
More features shouldn’t come at the cost of speed. Optimize smartly.
12 Ways To Speed Up Your Ecommerce Website
Take note of these practical tips, assess your current site performance, and prioritize what needs fixing first.
1. Use a Content Delivery Network (CDN)

A CDN (Content Delivery Network) speeds up your site by storing copies of your content across multiple servers worldwide. Instead of every visitor pulling data from a single location, they get it from the server closest to them and ****resulting in faster load times and a smoother experience.
If your store serves customers across different regions, a CDN is a game changer.
A CDN doesn’t just speed up your site it also keeps it stable under heavy traffic.
By distributing visitors across multiple servers, it reduces the load on your main server, keeping your store fast and responsive, even during peak sales periods. That extra 1-2 second boost? It can mean the difference between a sale and a bounce.
How to Choose the Right CDN?
Look for:
- Speed – How fast is the average response time?
- Reliability – Does it experience frequent downtime?
- Integration – Does it work seamlessly with your eCommerce platform?
For a solid start, check out Cloudflare and Amazon CloudFront, both known for performance, security, and seamless integration.
2. Optimize Your Hosting for Speed & Stability

Your hosting provider is the backbone of your site’s performance. A reliable, scalable host ensures your store can handle traffic spikes, grow with your business, and minimize downtime, so customers can shop anytime, without delays.
3 Ways to Optimize Hosting & Prevent Crashes
- Implement Load Balancing – Spread incoming traffic across multiple servers to prevent overload and keep load times steady.
- Choose High-Performance Hosting Plans – Look for plans with more RAM, SSD storage, and optimized servers to handle high traffic without slowing down.
- Enable Auto-Scaling – Automatically adjust server resources based on demand to keep performance smooth during peak sales. (Your hosting provider can help set this up.)
The Right Host Makes All the Difference
Pick a hosting provider that checks all these boxes or get an expert who can help you choose the right server infrastructure for your eCommerce business.
3. Optimize for Core Web Vitals

Google doesn’t just rank websites based on keywords, it prioritizes user experience. That’s where Core Web Vitals come in. These metrics measure how fast, responsive, and visually stable your site is.
Here’s what matters most:
- Loading Performance – How fast does your page load?
- Responsiveness – How quickly does your site react to user interactions?
- Visual Stability – Does your layout shift while loading, causing misclicks?
These factors directly impact how users experience your store and how Google ranks it.
How to Improve Core Web Vitals
To boost your site speed, responsiveness, and stability, apply these Core Web Vitals strategies:
Speed Up Loading (LCP)
- Use the Fetch Priority API to load critical elements (like images) faster.
- Compress images and switch to WebP format for smaller file sizes.
- Embed critical elements directly in HTML instead of relying on delayed dynamic loading.
Make Interactions Smoother (INP)
- Streamline JavaScript execution to prevent delays.
- Prioritize critical scripts and remove unnecessary tasks that block the main thread.
- Optimize event handlers for instant interactions.
Prevent Layout Shifts (CLS)
- Set size attributes for images and ads so content doesn’t shift unexpectedly.
- Load layout-affecting elements early to maintain visual stability.
Bonus Tip: Separate Front-End & Back-End
Decoupling the front-end from the back-end allows your site to load UI elements independently, speeding up page load times and making maintenance easier.
Minimize Plugin Bloat
Choose wisely – Pick well-coded, regularly updated plugins to avoid slowdowns.
Limit use – Every plugin adds extra code, so keep only the essentials to maintain speed.
A lean, well-optimized site doesn’t just perform better, it converts better.
4. Optimize Your Images for Faster Load Times
Large image files slow down your site but shrinking them without losing quality keeps everything fast and sharp.
4.1 Apply Image Compression Techniques
Lossy Compression – Removes some image data to significantly reduce file size. Best for bulk product photos where minor quality loss isn’t noticeable. Use tools like TinyPNG and Optimizilla for this.
Lossless Compression – Preserves every detail while reducing size. Ideal for logos, main product images, and high-quality graphics. Try ShortPixel to keep visuals crisp without the extra weight.
Compress smart, load fast, sell more.
4.2 Choose the Right Image Format
Not all image formats are created equal. The right choice can shrink file sizes without sacrificing quality, improving your site speed and visuals.
Here’s a quick breakdown to help you decide:
- WebP – Best for most eCommerce images. Smaller than JPEG and PNG while keeping high quality.
- JPEG – Great for product photos. Balanced file size and quality but no transparency support.
- PNG – Best for images that need transparency (like logos). Higher quality but larger file sizes.
Picking the right format ensures crisp visuals and fast load times a win-win.

Why Does Transparency Matter?
Transparency makes sure your logos, icons, and design elements blend seamlessly with different backgrounds. That’s why PNG or WebP are great choices if visuals are a big part of your brand.
But if you’re an eCommerce store with hundreds of product photos, JPEG is usually enough.
Want the best of both worlds? WebP delivers high quality without slowing down your site.
How to Use WebP?
You can manually convert images or use a tool like NitroPack, which automatically converts them while keeping a backup of the original in case a browser doesn’t support WebP.
4.3 Implement Lazy Loading for Faster Pages
Lazy loading delays image loading until needed, so your site loads instantly without waiting for every image to appear at once.
Why does this matter?
- Faster initial load times = lower bounce rates.
- Ideal for mobile users on slower connections.
- Perfect for long pages (like product catalogs or blog posts).
How to Add Lazy Loading?
Use Plugins – If you’re on WordPress, install LazyLoad for an easy setup.
Use HTML Attributes – Add loading="lazy" to your <img> tags to let browsers load images only when they’re about to be seen.
This simple tweak boosts performance and conversions without sacrificing visuals.
5. Minimize HTTP Requests for Faster Load Times

Every element on your page like images, scripts, stylesheets, fonts sends an HTTP request. The more requests, the longer your site takes to load.
For eCommerce stores with heavy content, this can be a performance killer. So, how do you cut down on unnecessary requests?
5.1 Combine CSS & JavaScript Files
Every separate CSS and JavaScript file your site loads creates an HTTP request. The more requests, the slower your site gets.
Solution? Merge multiple CSS and JavaScript files into a single, optimized file.
Why? Fewer requests = less server load = faster page speeds.
This simple tweak boosts efficiency without affecting functionality.
5.2 Use CSS Sprites for Icons & Small Images
Every small image like icons, buttons, logos, sends a separate HTTP request, slowing your site down. CSS sprites solve this by combining multiple images into one file, reducing the number of requests.
How it works? Your site loads one image instead of many, then displays the needed part using CSS.
Best for? Frequently used icons, logos, and small graphics.
How to create a sprite? Use **Toptal’s CSS Sprite Generator,** just upload your images, and it will generate a sprite file for you.
A small change with a big speed boost.
5.3 Reduce Plugins & Widgets for a Leaner, Faster Site
Too many plugins = a bloated, slow site. That’s why regular audits are essential.
How to Optimize Plugins & Widgets:
Audit Monthly – Check if each plugin is still useful. If not, remove it.
Test Performance – Activate/deactivate plugins one by one to see which slow down your site.
Use Multi-Function Plugins – Instead of five separate tools, choose one that does it all.
Example: NitroPack handles caching, image optimization, a built-in CDN, and code minification, all in one tool.
And don’t forget, always keep your plugins updated for better security and speed.
6. Enable Browser Caching for Faster Load Times

Browser caching stores copies of your site’s files on visitors’ devices, so when they return, their browser loads the cached files instead of making new requests to the server. The result? Faster load times and reduced bandwidth usage.
What Should You Cache?
Static Content – Files that don’t change often, such as:
CSS
PDFs
JavaScript files
HTML documents
How to Set Up Browser Caching?
Manual Method – Edit your .htaccess file to include caching rules like:
ExpiresActive On
ExpiresByType image/jpeg "access plus 1 year" (Caches JPEGs for a year)
Easy Method – Use NitroPack and enable “Cache Warmup” to automate the caching process without manual coding.
Less server strain, faster speeds, happier customers.
7. Minify CSS, JavaScript & HTML for a Lighter, Faster Site

Minification removes extra spaces, comments, and line breaks from your code, shrinking file sizes without changing functionality. The result? Faster load times and a more efficient site.
How to Minify Code?
Use Manual Tools
- UglifyJS – Minifies JavaScript.
- CSSNano – Optimizes and compresses CSS.
Automate with NitroPack
- Auto-applies minification & compression to CSS, JavaScript, and HTML.
- Uses AST (Abstract Syntax Tree) optimization to break down and simplify code.
Check Minification Settings:
Go to NitroPack Dashboard → Cache Settings → Cache to ensure “Minify Resources” is enabled.
Cleaner code = Faster performance.
8. Implement Accelerated Mobile Pages (AMP) for Faster Mobile Load Times

AMP strips down HTML, CSS, and JavaScript to create lightweight, fast-loading pages, giving your site a competitive edge over slower websites.
Why AMP Matters?
Loads faster on mobile – Improves shopping experience.
Reduces data usage – Great for mobile users with slow connections.
SEO Boost – Google prioritizes AMP pages in search rankings.
How to Implement AMP?
Start Small – Apply AMP to key pages first (like product & landing pages) to test impact.
Analyze Traffic – Use Google Analytics (Reports → Engagement → Pages & Screens) to find high-traffic pages.
Use WordPress Plugins – Install an AMP plugin for easy integration.
Manual Setup (Non-WordPress Users) – Requires AMP markup coding, best handled by a developer.
A fast mobile site means higher engagement, better rankings, and more conversions.
9. Optimize Your Database for Faster Performance

A cluttered database slows down your site. Optimizing it ensures fast data retrieval and minimal downtime.
How to Clean Up Your Database?
Remove Unnecessary Data – Delete old records, duplicate entries, and expired carts.
Optimize Tables – Run regular maintenance to keep queries efficient.
Using phpMyAdmin to Import/Restore Your Database:
Open phpMyAdmin from your hosting control panel.
Select your database and click on the “Import” tab.
Choose your backup file and hit “Go” to restore it.
A well optimized database = a faster, smoother eCommerce experience.
Fine-Tune Your Database for Maximum Efficiency
Once you’ve cleaned up unnecessary data, take these extra steps to keep your database running smoothly:
Optimize Tables in phpMyAdmin
Go to your hosting account and click on Databases.
Select the database you want to optimize.
Check all tables and choose “Optimize Table” from the dropdown.
Pro Tip: Set up monthly cleanups to prevent database clutter.
Speed Up Queries with Efficient Indexing
Write precise queries – Avoid SELECT * (fetch only what you need).
Use indexing – Helps retrieve data faster by creating a roadmap for search queries.
Apply indexing in MySQL – Identify frequently searched columns and use the CREATE INDEX command in your SQL editor.
A leaner, optimized database = faster page loads & better user experience.
10. Utilize Browser Prefetching for Instant Page Loads

Browser prefetching anticipates user actions and loads data before it’s needed—reducing wait times and making browsing feel instantaneous.
2 Types of Prefetching:
Link Prefetching – Loads actual content before a user clicks.
Best for: Popular links & navigation menus (boosts conversions).
How to apply? Add this to your HTML:
<link rel="prefetch" href="<https://yourstore.com/products/blue-t-shirt>">
DNS Prefetching – Resolves domain names in advance.
Best for: External links (eliminates domain lookup delays).
How to apply? Add this to your HTML:
<link rel="dns-prefetch" href="//stellarshop.com">
Why use it? Faster navigation = smoother shopping experience = more conversions.
11. Reduce Server Response Time for Faster Performance

Server response time = how quickly your server processes user requests.
Ideal time? Under 200ms (for better SEO & user experience).
How to Reduce Server Response Time?
Optimize Backend Code
- Remove redundant database queries & complex processing.
- Use tools like PHP CodeSniffer (for PHP) & ESLint (for JavaScript) to detect inefficiencies.
Upgrade Your Server Hardware
- Contact your hosting provider about faster CPUs, more RAM, and SSD storage.
- Consider a dedicated server or VPS for better performance.
Use a CDN
- Distributes traffic so servers handle fewer direct requests.
Monitor Performance Regularly
- Use GTmetrix & Google PageSpeed Insights to track and improve response times.
A faster server = happier users & better search rankings.
12. Set Up a Web Performance Budget for Consistent Speed

A web performance budget sets limits on page size, load times, and HTTP requests, helping you maintain fast, stable performance as your site grows.
How to Create a Web Performance Budget?
Step 1: Analyze Competitors
- Use PageSpeed Insights to check their homepage, product pages, & blog speed.
- Set a benchmark – Aim to be 20% faster (e.g., if they load in 3 sec, aim for 2.4 sec).
Step 2: Establish a Performance Baseline
- Use WebPageTest for stable speed data.
- Clear browser cache before testing.
Step 3: Set & Apply Budget Limits
- Use the Performance Budget Calculator to define limits for file sizes, requests, and load speed.
- Work with a developer for technical setup (e.g., enforcing limits through code optimizations).
Why do this? It helps you catch issues early, maintain fast load times, and stay ahead of competitors.
3 Must-Know Tools to Measure Website Speed
Speed optimization means nothing if you can’t measure results. Here are 3 essential tools to track and improve your eCommerce site’s performance:
1. Google PageSpeed Insights
- Provides Core Web Vitals scores (LCP, INP, CLS).
- Offers specific recommendations to improve speed & user experience.
2. GTmetrix
- Gives detailed waterfall reports on load times & bottlenecks.
- Tracks historical performance trends for ongoing optimization.
3. WebPageTest
- Tests real world performance under different locations & devices.
- Provides advanced diagnostics like first contentful paint & time to first byte (TTFB).
Pro Tip: Use all three together to get a complete picture of your site speed and areas for improvement.
Key Takeaways
Speed can make or break your eCommerce store. Test it today using Google PageSpeed Insights, GTmetrix, or WebPageTest to uncover what’s slowing you down.
Prioritize fixes that matter. Review the insights with your team or an expert and implement high-impact changes first.
Optimization isn’t a one-time task. Track improvements, tweak strategies, and stay ahead of the competition.
A fast site doesn’t just improve UX, it boosts conversions and revenue.